Implementing Camera Functionalities
1. Overview
With the Mobile SDK, you can configure camera parameters, including the resolution, frame rate, exposure settings, image settings, and file type, and implement photo taking and video recording functionalities. This tutorial is designed for you to gain a basic understanding of how to use camera APIs provided by Mobile SDK. In this tutorial, we will implement three basic camera functionalities Taking photos, Recording videos, and Setting camera parameters.
Note: The functionality of displaying photos and videos depends on video stream decoding and rendering. For details, see Implementing Video Decoding. This article describes how to quickly access video streams and render these streams on your phone screen. Alternatively, you can directly send commands to implement such functionality.
The following takes Autel_UX_SDK demo as an example to explain how to develop these three basic functionalities.
2. Import the SDK
Mobile SDKprovides APIs that can be used to access each functional module of the aircraft. By usingMobile SDK, developers can automate flight, control the camera and gimbal, receive videos and images transmitted in real time and sensor data, download saved media files, and monitor the status of other components.AutelUXFrameworkis a basic function library encapsulated by Autel. It provides tool classes, basic controls, and basic components such as the map component.
2.1 Import Mobile SDK
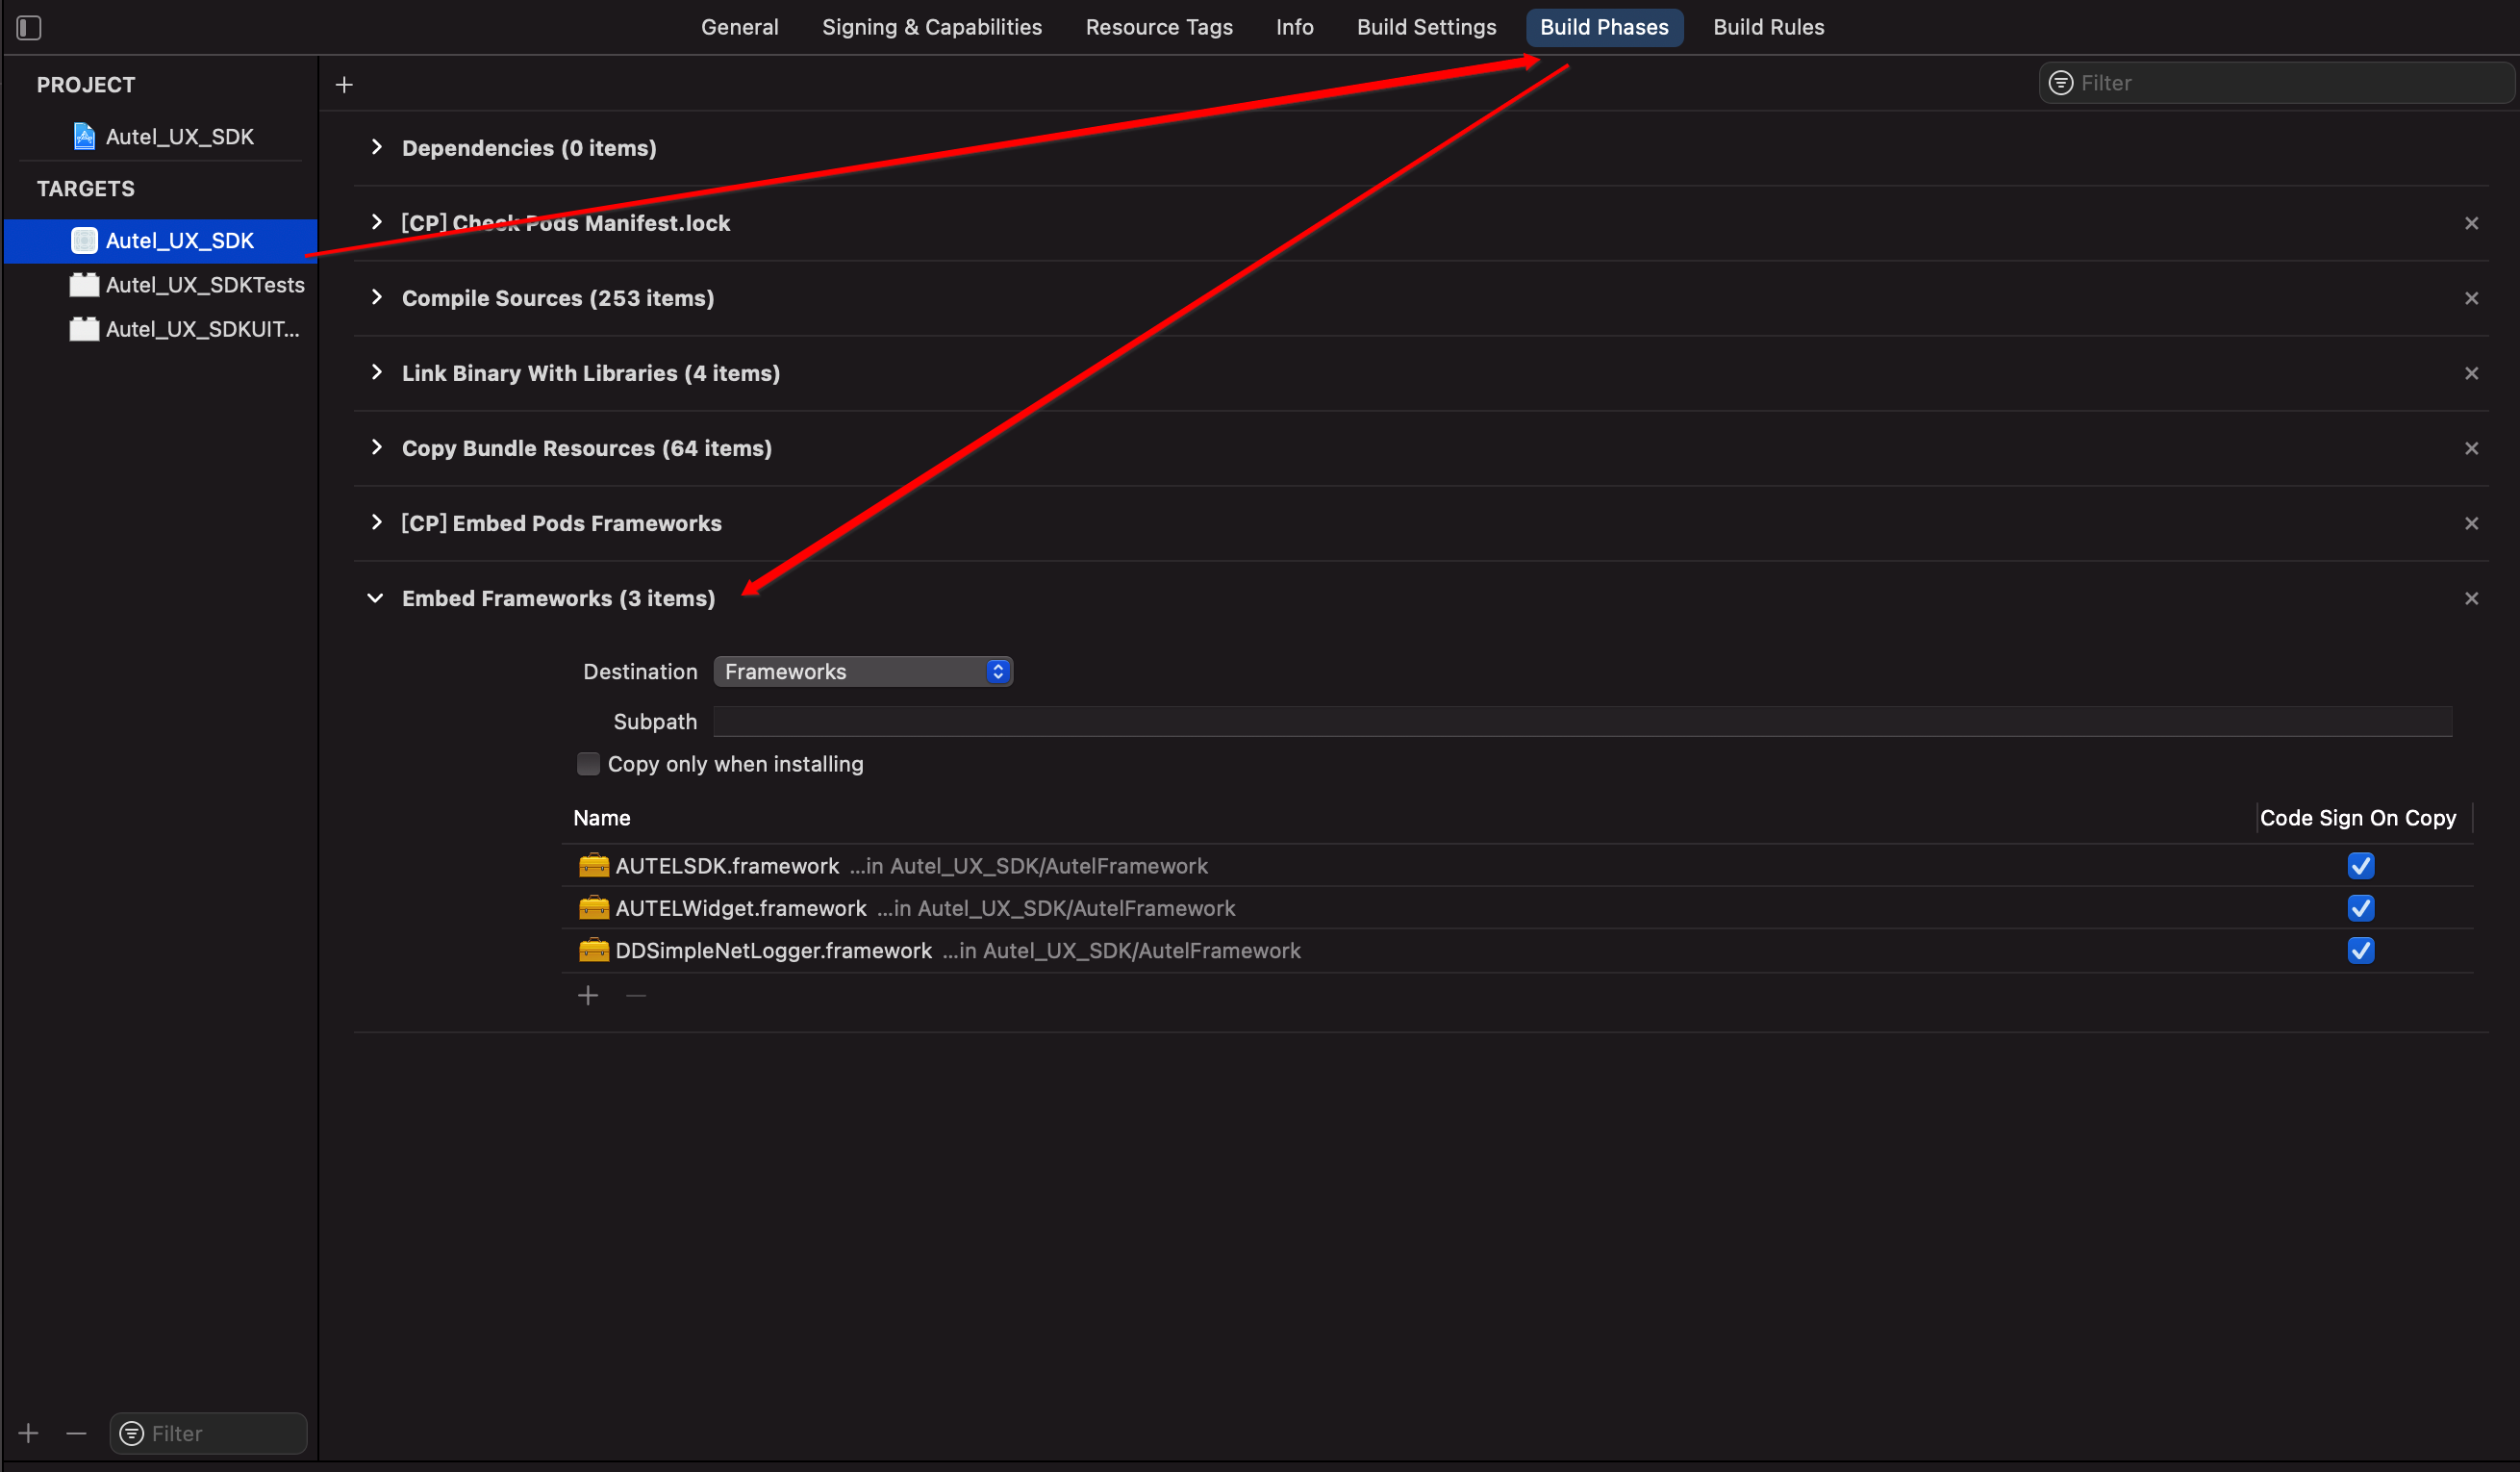
Import the AUTEL Mobile SDK, including the following three frameworks: AUTELSDK.xcframework, AUTELWidget.xcframework, and DDSimpleNetLogger.xcframework.
Import it by referring to the instructions on how to import Autel_UX_SDK: Target -> Build Phases -> click + in the upper left corner -> New Copy Files Phase and then set Destination to Frameworks under Embed Frameworks
2.2 Import Autel Framework
Import the Autel framework by referring to the instructions on how to import Autel_UX_SDK: TARGET > General > Import AutelUXFramework.framework under Frameworks, Libraries, and Embedded content
3. Camera APIs
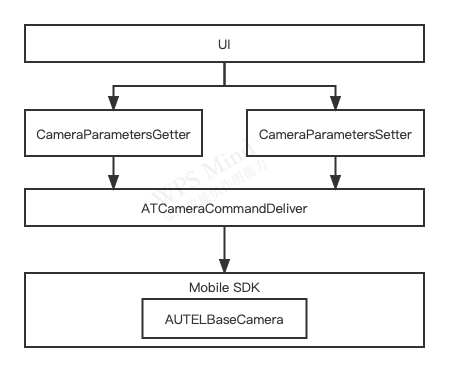
In this example, to facilitate camera functionality development, we encapsulated camera APIs provided by the Mobile SDK again. The following three classes are involved ATCameraCommandDeliver, CameraParametersGetter, and CameraParametersSetter.
- ATCameraCommandDeliver: This class is used for encapsulating camera APIs provided by the Mobile SDK again.
- CameraParametersGetter: a collection of all getter APIs of the ATCameraCommandDeliver class.
- CameraParametersSetter: a collection of all setter APIs of the ATCameraCommandDeliver class.
The following figure shows the call relationships between these APIs:
4. API Functionality
Mobile SDK provides a great variety of camera APIs, which will not be described in detail one by one in this chapter. We have already encapsulated all camera APIs in the ATCameraCommandDeliver class. By referring to this class, you will know how to call camera APIs of Mobile SDK. The following describes main functionalities of camera APIs:
- Camera mode: Video recording mode and still image capture mode
- Exposure: Shutter, ISO, aperture, and exposure compensation
- Image parameters: Screen aspect ratio, contrast, hue, clarity, saturation, filter, photo format
- Video parameters: Resolution, frame rate and encoding format
- Camera direction: When you install a camera on the gimbal, you can control the camera direction by using APIs.
5. Develop Photo Taking and Video Recording Functionalities
5.1 Create a Main UI
In this example, to facilitate switching between the photo taking and video recording mode, the ViewController for photo taking and that for video recording are all used as the sub ViewController of the main UI. The main UI is the base of the whole view. First of all, create ATConsoleViewController and ATConsoleViewModel.
To obtain the camera or aircraft status in real time or upload parameters, ATConsoleViewController or ATConsoleViewModel must conform to CameraProtocol and DroneProtocol.
Note: If ATConsoleViewController or ATConsoleViewModel is not inherited from BaseViewController but from NSObject, you must call the following code to register the protocols. Otherwise, the protocols do not take effect. BaseViewController has already automatically been registered with the protocols. Therefore, no protocol needs to be registered again for classes inherited from it.
  func registerProtocol() {
        registerAutelProtocolsIfCan()
    }
You can deregister the protocols using the following code when the class is destroyed:
  func  removeProtocol() {
        removeAutelProtocolsIfCan()
    }
CameraProtocol:
public protocol CameraProtocol : AutelUXFramework.CheckProtocol {

    func camera(_ camera: AUTELBaseCamera!, didUpdateConnectState connectState: AUTELCameraConnectState)

    func camera(_ camera: AUTELBaseCamera!, didUpdateRecordRecoverState recoverState: AUTELCameraRecordRecoverState)

    func camera(_ camera: AUTELBaseCamera!, didGenerateNewMediaFile newMedia: AUTELMedia!)

    func camera(_ camera: AUTELBaseCamera!, didUpdateSDCardState sdCardState: AUTELCameraSDCardState!)

    func camera(_ camera: AUTELBaseCamera!, didUpdateMMCState mmcState: AUTELCameraSDCardState!)

    func camera(_ camera: AUTELBaseCamera!, didUpdateSystemState systemState: AUTELCameraSystemBaseState!)

    func camera(_ camera: AUTELBaseCamera!, didUpdateParameters parameters: AUTELCameraParameters!, change: [AnyHashable : [Any]]!)

    func camera(_ camera: AUTELBaseCamera!, didUpdateCurrentExposureValues exposureParameters: AUTELCameraExposureParameters!)

    func camera(_ camera: AUTELBaseCamera!, didUpdateHistogramTotalPixels totalPixels: Int, andPixelsPerLevel pixelsArray: [Any]!)

    func camera(_ camera: AUTELBaseCamera!, didUpdateTimeLapseCaptured captureCount: Int, andCountDown timeInterval: TimeInterval)

    func camera(_ camera: AUTELBaseCamera!, didUpdateAutoFocusState focusState: AUTELCameraAFLensFocusState, andLensFocusAreaRowIndex rowIndex: Int, andColIndex colIndex: Int)

    func camera(_ camera: AUTELBaseCamera!, didUpdateAeAfState state: AUTELCameraAFWorkStatus)
}
The following CameraProtocol is used for obtaining the real-time status of camera parameters. For other protocols, they will be used in the album or histogram module, which will be discussed specifically in the documentation about that module.
extension ATConsoleViewModel: CameraProtocol{
    func camera(_ camera: AUTELBaseCamera!, didUpdateConnectState connectState: AUTELCameraConnectState) {
        guard connectState == .connected else {
            printLog("Camera Unconnect")
            return
        }
        updateCameraWorkMode()
    }

    func camera(_ camera: AUTELBaseCamera!, didUpdateSystemState systemState: AUTELCameraSystemBaseState!) {
        DispatchQueue.main.async {
            self.mediaViewModel?.loadSystemState(systemState)
            self.setupThumbnail()
        }
    }

}
When you connect the camera, you can obtain the work mode of the camera by using the following code:
func updateCameraWorkMode() {
        ATCameraCommandDeliver.getWorkMode { (workMode, error) in
            if let err = error {
                printLog("get camera work mode failure.\(err.localizedDescription)")
                return
            }
            let workMode = workMode.toAT()
            self.workModelHandle?(workMode)
        }
    }
The following shows the work modes supported by the camera. This tutorial only discusses the photo taking (single, burst, AEB, and periodic) and video recording.
public enum AUTELCameraWorkMode : UInt8, @unchecked Sendable {

    /**
     *  @brief Single shot
     *
     * Single
     */
    case captureSingle = 0

    /**
     *  @brief Video mode
     *
     * Recording
     */
    case recordVideo = 1

    /**
     *  @brief Burst
     *
     * Burst
     */
    case captureBurst = 2

    /**
     *  @brief Timelaspe
     *
     * Periodic
     */
    case captureInterval = 3

    /**
     *  @brief AEB
     *
     *  AEB
     */
    case captureAEB = 4

    /**
     *  @brief Panorama
     *
     * Panorama
     */
    case capturePanorama = 5


    /**
     *  @brief Slow Motion
     *
     * Slow motion
     */
    case recordVideoSlowMotion = 6

    /**
     * @brief Looping
     *
     * Loop
     */
    case recordVideoLooping = 7


    /**
     *  @brief Moving TimeLapse
     *
     * Hyperlapse
     */
    case captureMovingTimeLapse = 8

    /**
     *  @brief HDR
     *
     *  HDR
     */
    case captureHDR = 9

    /**
     *  @brief MFNR
     *
     * Night
     */
    case captureMFNR = 10

    /**
     *  @brief Camera work mode unknown
     *
     * Unknown work mode
     */
    case unknown = 255
}
After you obtain the work mode, you can update the panel UI on the right and determine whether to display ViewController for photo taking or video recording.
extension ATCameraWorkMode{
    func createCameraVC() -> ATCameraViewController {
        let vc: ATCameraViewController
        switch self {
        case .video:
            vc = ATVideoCameraViewController()
        case .photo:
            vc = ATPhotoCameraViewController()
        }
        return vc
    }
}


  func updateCameraVC(workMode: ATCameraWorkMode) {
        let vc = workMode.createCameraVC()
        addChild(vc)
        view.insertSubview(vc.view, belowSubview: contentView.rightView)
        cameraVC?.view.removeFromSuperview()
        cameraVC?.removeFromParent()
        cameraVC = vc
        isLanscape ? showLanscape() : showPortrait()
    }
5.2 Create an Operation Panel on the Right
To facilitate switching between photo taking and video recording, create UI controls inside ATConsoleRightControlView, as shown below:

The code for switching between photo taking and video recording modes is shown below:
  private func setCameraWorkMode(_ workMode: ATCameraWorkMode){
        cameraWorkMode = workMode
        CameraParametersSetter.setParameterWithBranch(.workMode, andValue: workMode.toAutel().rawValue)
    }
5.3 Create a Photo Taking View
Create ATPhotoCameraViewController for implementing specific photo taking functionalities and gestures. The rendering of video streams is still implemented by ATConsoleViewController.
The following code sends the command for starting and stopping photo taking. If the camera is in Single/AEB/Burst mode, you do not need to send a command to stop photo taking. However, when the camera is in periodic mode, you must send a stopping command.
 func takePhoto() {
        ATCameraCommandDeliver.takePhoto { (error) in
            if let error = error {
                printLog("take photo error: \(error.localizedDescription)")
            }
        }
    }

    func stopPhoto() {
        ATCameraCommandDeliver.stopPhoto { (error) in
            if let error = error {
                printLog("stop photo error: \(error.localizedDescription)")
            }
        }
    }
To change the view of the right operation panel, you can listen for the changes of photo taking status by using camera protocols when the camera is taking photos.
override func loadSystemState(_ systemState: AUTELCameraSystemBaseState!) -> Void {
        super.loadSystemState(systemState)
        isShooting.accept(systemState.isShooting)
        updatePhotoMode()
        if systemState.isRunning {
            state.accept(.running)
            return
        }
        if state.value == .running{
            state.accept(.finish)
            return
        }
        state.accept(systemState.mode.toAT() == .photo ? .ready : .disable)
    }
5.4 Create a Video Recording View
Create ATVideoCameraViewController for implementing specific video recording functionalities and gestures. The rendering of video streams is still implemented by ATConsoleViewController. ATVideoCameraViewController and ATPhotoCameraViewController are all inherited from ATCameraViewController.
The code for sending commands to start and stop video recording is shown below:
func startRecord() {
        ATCameraCommandDeliver.startRecording { (error) in
            if let error = error {
                printLog("start recording error: \(error.localizedDescription)")
            }
        }
    }
    func finishRecord() {
        ATCameraCommandDeliver.stopRecording { (error) in
            if let error = error {
                printLog("stop recording error: \(error.localizedDescription)")
                return
            }
            self.state.accept(.finish) //Stop the video recording
        }
    }
To change the view of the right operation panel, you can listen for the changes of video recording status by using camera protocols when the camera is recording a video.
override func loadSystemState(_ systemState: AUTELCameraSystemBaseState!) -> Void {
        super.loadSystemState(systemState)
        isShooting.accept(systemState.currentPivStatus == .photoTaking)
        currentRecordSecondsText.onNext(currentRecordSecondsText(Int(systemState.currentVideoRecordingTimeInSeconds)))
        if !CameraSDCardState.shared.isVerified {
            currentRemainSecondsText.onNext(currentRecordSecondsText(CameraSDCardState.shared.availableRecordingTime()))
        }
        if systemState.isRecording && state.value != .finish {
            state.accept(.running)
            return
        }
        if systemState.isRecording {
            return
        }
        state.accept(systemState.mode == .recordVideo ? .ready : .disable)
    }


  func currentRecordSecondsText(_ seconds: Int) -> String {
        return "\((seconds / 3600).format(format: "02")):\((seconds / 60).format(format: "02")):\((seconds % 60).format(format: "02"))"
    }
6. Parameter Settings
The SDK provides a great variety of camera parameters. We create an enumeration for you to view them easily.
Camera parameters:
/// Use ParametersAction to set obtained parameters
enum CameraMenuBranch: String {
    case photoFormat = "PhotoFormat"
    case videoFormat = "VideoFormat"
    /// Photo resolution
    case photoSize = "size"
    /// Photo taking mode
    case workMode = "mode"
    /// Exposure mode
    case exposureMode = "exposure"
    /// ISO
    case iso = "iso"
    /// ISO mode
    case isoMode = "iso mode"
    /// Exposure compensation
    case exposureCompensation = "ev"
    case digitalFilter = "color"
    case videoStandard = "standard"
    /// Video resolution
    case videoResolution = "Resolution"
    /// Video frame rate
    case frameRate = "FrameRate"
    /// Digital zoom AF & AE
    case digitalZoom = "digital zoom"
    case piv = "piv"
    /// Shutter speed
    case shutterSpeed = "shutter"

    case hdr = "hdr"
    case mfnr = "mfnr"
    case irColor = "ir color" // Corresponds to "menu": "ir color",
    case overlapOffset
    /// Dual-light camera, thermal display mode, AUTELCameraThermalDisplayMode
    case display
    /// Photo taking mode - burst
    case photoBurst = "burst"
    /// Photo taking mode - Auto Exposure Bracketing (AEB)
    case photoAeb = "aeb"
    /// Photo taking interval
    case photoTiming = "timelapse"

    //------ White balance
    /// White balance
    case whiteBalance = "wb"
    /// White balance - Custom
    case wbCustom = "wb custom"
    //------
    // Video compression standard
    case encodingFormat = "VideoEncodingStandard"

    /// Defog isOn
    case dehaze
    /// Defogging value
    case dehazeValue
    /// ROI isOn
    case roi
    /// ROI value
    case roiValue
    /// Temperature alarm for thermal imaging
    case irTempAlarm
    /// Emissivity
    case irTempEmit
    /// Image mode for thermal imaging
    case irImageMode
    /// Image mode for thermal imaging - Contrast and brightness
    case irImageModeParm
    /// Thermal image enhancement
    case irEnhance
    /// Thermal image denoising switch
    case irNr
    /// Gain for thermal imaging
    case irGain
    /// Isothermal temperature mode for thermal imaging
    case irIsoThermMode
    /// Isothermal temperature threshold for thermal imaging
    case irIsoThermModeParm
    /// Focusing mode
    case af
    /// AE/AF lock
    case aeLock
    /// Row where the spot is located [1...15]
    case spotRow
    ///Column where the spot is located [1...23] xt701 [1...17]
    case spotCol
    /// Spot coordinate for spot metering
    case spotCoordinate
    /// Aperture
    case aperture

    //----- Photo taking style
    /// Photo taking style
    case style
    /// Photo taking style - Custom
    case styleCustom = "style custom"
    /// Photo taking style - Custom - Sharpness (this parameter only takes effect when style == styleCustom)
    case sharpness
    /// Photo taking style - Custom - Contrast (Photo taking style - Custom)
    case contrast
    /// Photo taking style - Custom - Saturation (Photo taking style - Custom)
    case saturation
    /// Photo taking style - Custom - Hue (Photo taking style - Custom)
    case hue
    //----- Photo taking style

    //Camera settings
    case grid
    case centerPoint
    case antiFlicker
    case captionEnable
    case histogram
    case afFocusAssist
    case mfFocusAssist
    case store
    case gimbalLockState//Gimbal locking state

    //Special menu, gimbal angle
    case gimbalAngle = "gimbal"

    /// Format for time-lapse photography
    case photoFormatDelayShot = "phofor delayshot"

    case unknown
}
After you connect the camera, you can get all values of camera parameters at one time:
CameraParametersGetter.loadAllParameters()
Of course, you can also obtain a specific camera parameter. This will be detailed later.
We designed the CameraSelection class to store camera parameters. You can directly use this class to obtain a camera parameter when you need to use the parameter.
For example, to obtain the work mode of the camera, you can use the following code:
let workMode = CameraSelection.shared.valueWith(.workMode).realData
Some camera parameters may have sub parameters. To facilitate parameter management, we defined the CameraMenuItem class to manage camera parameters.
The following code shows how to use this class to obtain the video resolution:
  let menu = CameraMenuItem(style: CameraMenuStyle.branch(.videoResolution)) //Generates an object
  let menuSub = menu.getNewChildren() ?? [] //Sub menu of the menu
  let select = CameraMenuItem.findSelectedIndexPathJustInParent(menuSub) ?? 0 // Currently selected menu
  let arry  = CameraModelMenuItemHandler.parseSubMenuItems(item: menu) ?? [] // Display name of the sub menu [3840x2160.]
Obtain a single camera parameter (taking photo resolution as an example):
 CameraParametersGetter.getPhotoSize(with: { [weak self] (error) in
                guard let self = self else { return }
                if error == nil {
                    let value = CameraSelection.shared.valueWith(.photoSize).realData.digitalValue() ?? 0
                    prin("size \(value)")
                }
            })
Set a camera parameter (taking the photo format as an example):
let value = AUTELCameraPhotoFileFormat.DNG.rawValue
 CameraParametersSetter.setParameterWithBranch(CameraMenuBranch.photoFormat,
                                                      andValue: value,
                                                      with: { (error) in
            guard let self = self else { return }
            if error == nil {
               let value = CameraSelection.shared.valueWith(.photoFormat).realData.digitalValue() ?? 0
               prin("photoFormat \(value)")
            }
        })
You can use the same way to display or modify camera parameters.
7. Summary
At this end of the tutorial, you have learned how to use the Mobile SDK to develop the functionalities of photo taking, video recording, and camera parameter settings. Hope you like this tutorial and continue to learn our next tutorial!