Using the Raspberry Pi Development Kit
Introduction
The PSDK developer kit is used to convert the UAV’s interfaces into various standard hardware interfaces, making it easier for developers to connect hardware devices and perform SDK development and debugging. The PSDK developer kit supports various UAV models and compatible airframe interfaces.
This example will use the Autel Alpha UAV, the PSDK developer kit, and the RPI (Raspberry Pi) 4B developer kit to demonstrate a series of development steps, including hardware connections, software environment setup, obtaining the development package, and compiling and running the software, to help you quickly get started with Payload SDK (hereafter referred to as PSDK) development.
Hardware Environment Preparation
1. Prepare Hardware Devices
| Hardware | Quantity | Purpose |
|---|---|---|
| Raspberry Pi 4B Development Kit | 1 | Runtime platform for PSDK |
| HD Monitor (with HDMI interface) | 1 | Used to display the Ubuntu system interface on the board |
| Keyboard + Mouse | 1 | Human-machine interaction for the Ubuntu system on the board |
| PSDK Developer Kit | 1 | Provides standard hardware interfaces |
| Ethernet Cable | 1 | Used to connect the board to access network resources |
| Autel Alpha UAV + Accessories (RC + Battery + Payload + Charging Box) | 1 | Application development hardware platform |
2. Hardware Connection
- Prepare an HD monitor, a set of keyboard and mouse, and a spacious desktop environment.
- Prepare an Autel Alpha UAV setup, and place the UAV on the desktop in a suitable position after installing the battery.
- Use coaxial cables or ribbon cables to connect the gimbal adapter ring to the PSDK adapter board.
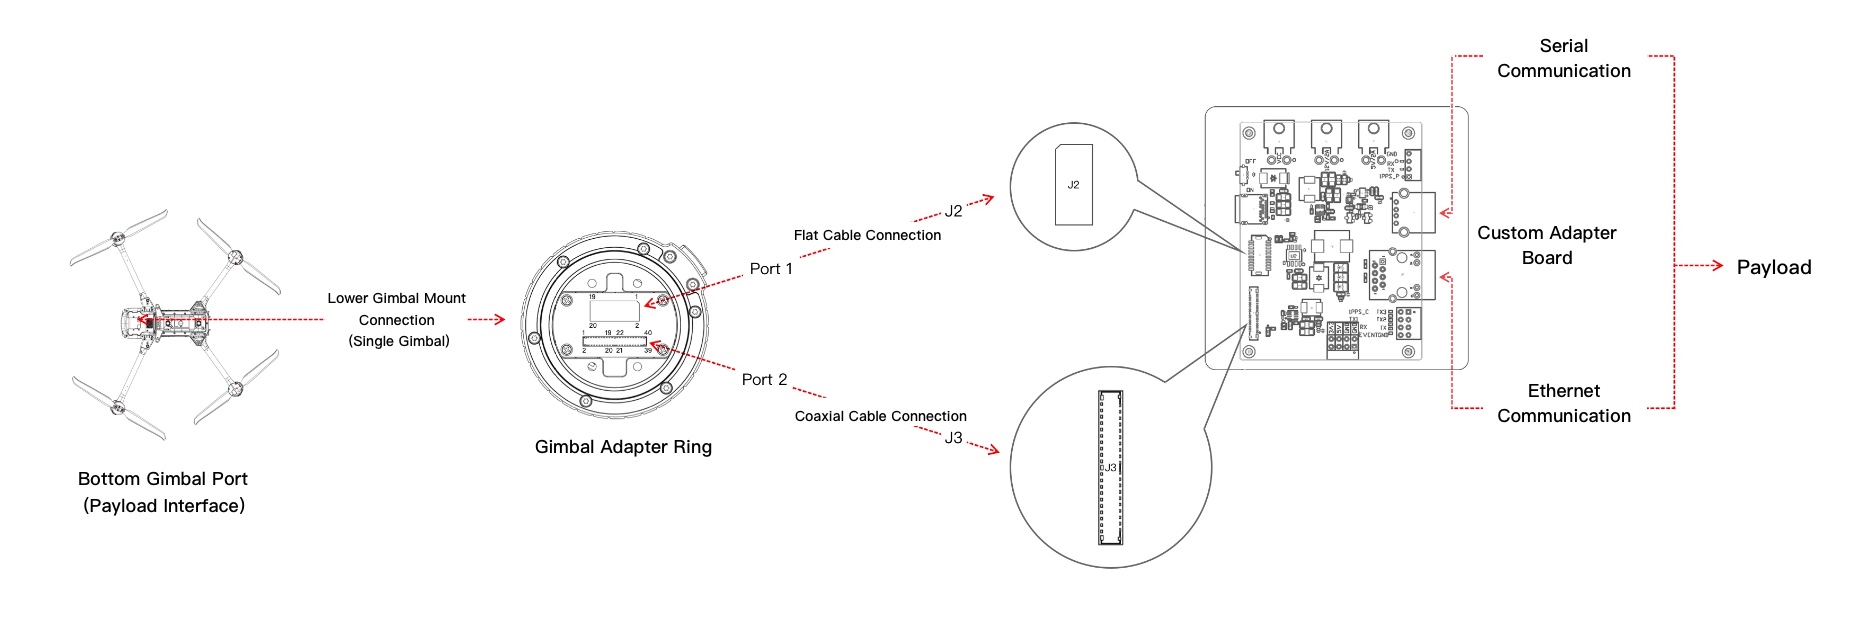
- Use an Ethernet cable to connect the PSDK adapter board to the Raspberry Pi development board.
- Power on the Raspberry Pi development board, connect the micro HDMI display output to the HD monitor, and plug the keyboard and mouse into the USB ports of the Raspberry Pi development board.
- Power on the UAV, turn on the power switch on the PSDK development board, and check if the power indicator light turns on. If it lights up, it indicates normal power supply.
- Observe the monitor and confirm if the Raspberry Pi development board enters the startup page.
Software Environment Setup
1. Install the Software Environment
- The Raspberry Pi 4B development kit does not include an SD card or a Raspberry Pi OS 64-bit system image by default. Please refer to the Raspberry Pi flashing guide to burn the image and configure the account. It is recommended to install a version of Ubuntu that supports the Raspberry Pi 4B development kit.
- After completing the hardware setup and booting up, enter the username and password you configured to check whether you can log in to the Raspberry Pi desktop system.
2. Register a PSDK Developer Account
You can register and apply to become a PSDK developer on the Autel Robotics Developer Platform.
3. Download the PSDK Software Package
Obtain the latest PSDK development package from the PSDK repository. The latest code is located on the master branch.
4. Modify Required Code
After creating an application in the developer center, you will receive the PSDK application information. You must fill this information into a designated file in the previously downloaded PSDK development package; otherwise, PSDK will not run properly.
- example/uav_sdk_app_info.h
#define USER_APP_NAME           "your_app_name"
#define USER_APP_ID             "your_app_id"
#define USER_APP_KEY            "your_app_key"
#define USER_APP_LICENSE        "your_app_license"
#define USER_DEVELOPER_ACCOUNT  "your_account"
#define USER_BAUDRATE_RATE      "460800"
5. Compilation and Execution
Generate the corresponding Linux version of the PSDK software package and execute the binary file.
| Feature | File Name | Description |
|---|---|---|
| Custom Widgets | custom_widget.cxx | Describes the initialization of custom widgets, how to set the configuration file path, and how to register callback functions. |
| Low-Speed Data Channel | data_channel.cxx | Describes the initialization and data transmission method of the low-speed channel. |
| High-Speed Data Channel | high_speed_channel.cxx | Describes the initialization and data transmission method of the high-speed channel. |
| Standard Gimbal Payload | gimbal.cxx | Describes the initialization of the standard gimbal payload, basic function test methods, and how to register callback functions. |
| Standard Camera Payload | payload_camera.cxx | Describes the initialization of the standard camera payload, basic function test methods, and how to register callback functions. |
| Precision Positioning | positioning.cxx | Describes the initialization of precision positioning, time synchronization methods, and how to obtain position information. |
| High-Frequency Messages | subscribe.cxx | Describes how to subscribe to high-frequency messages. |
| Tracer | tracer_example.cxx | Describes the initialization of Tracer and how to register basic function callback functions. |